A Hunter's Cry
A Hunter's Cry is the sixth Adventure in Sea of Thieves. It began on August 18, 2022 and ended on September 1, 2022. This Adventure focused on Merrick's continued interrogation by the Dark Brethren, and the Pirate Lord's attempt to recover Merrick from their vile clutches.
Official summary
Belle is certain Merrick knows something that can further the Brethren’s ambitions, and the race will soon begin to rescue him before Warsmith and her cohorts can coerce the helpless Hunter into spilling the beans – having already orchestrated Merrick’s demise once, there’s no telling what else she might be capable of doing.
Though a few grudge-bearing Reapers might consider all this to be Merrick’s just desserts in the wake of the ‘Lost Sands’ Adventure, all pirates will get their chance to set sail for the Sea of the Damned, assail the twisted Sea Dog Tavern and work alongside other crews to save him before it’s too late.
Those who know Merrick of old have almost completed their preparations. The mission to sail into hostile waters in an epic finale to this trilogy of Adventures is about to begin. Will pirate courage and tenacity see Merrick freed from the clutches of the Dark Brethren and ferried safely back to his Seapost? Find out for yourselves when ‘A Hunter’s Cry’ launches on August 18th, with your window of heroic opportunity lasting until September 1st. Just don’t forget the cannonballs…
Adventure Recap before The Sirens' Prize
VIEW RECAP
|
|---|
| Merrick has been rescued, but an old threat is stirring. The cannons have silenced, the portals have closed and the Veil of the Ancients has once again been hidden away. Thanks to the valiant efforts of pirate crews willing to venture into the Sea of the Damned and save Merrick, the Dark Brethren have been routed and their plans left in disarray. Belle insists that Merrick knows more than even he realises, and while it’s still not clear what information the Brethren hoped to gain from their pugnacious prisoner, his interrogation appears to have been interrupted just in time. But where does all this leave our luckless Hunter – and who else might have taken advantage of recent events to further their own schemes?
Merrick’s more familiar than most with the many perils of the pirate’s life, having lost several limbs in a mighty battle against a terrifying Megalodon aboard his ship, the Killer Whale. (His eye, conversely, was claimed by a particularly aggressive parrot, but that’s not a story he tells as often.) This reckless streak caused no end of domestic strain between Merrick, his spouse Serik and their extended family, but reconciliation proved possible when Merrick settled down at a Seapost to represent The Hunter’s Call and live out the rest of his days as an unassuming trader. At least until Belle came calling… Time spent sailing alongside the old salt during the events of ‘The Shrouded Deep’ has convinced Belle that Merrick either knows, or gleaned from their conversations, more than he should. It was certainly knowledge worth killing for, as the Dark Brethren tasked Amaranta with ending Merrick’s life and casting him to the Sea of the Damned, where her cohorts were waiting to ensnare him.
Unwilling to let Merrick’s secrets fall into the wrong ears, the Pirate Lord was convinced to make use of the Veil of the Ancients – a powerful relic that Merrick himself had helped to recover. With it, he opened passage into the Sea of the Damned, allowing courageous crews to set sail and lay siege to the Dark Brethren’s new hideout: a warped and twisted manifestation of the Sea Dog Tavern laced with devious mechanisms. It’s never been harder to order a grog. By taking control of nearby beacons and using them to light a path, Merrick’s benefactors made it to the summit and forced a frustrated Warsmith to withdraw empty-handed. Yet with her parting shot, she swore that the Brethren would torment Merrick and his loved ones for as long as he lived. So for his family’s sake, Merrick decided not to board the Ferry of the Damned and regain his flesh-and-blood form, choosing to shun the mortal coil and leave his family behind. Taking pity, the Pirate Lord has since arranged accommodation for the spectral Merrick that keeps him well out of harm’s way – although, so far as the larger Sea of Thieves is concerned, the forsaken fisherman never did make it home. One question remains, however: where, in the midst of this daring rescue and its bittersweet aftermath, was Belle herself? |
Deeds
Deeds are challenges related to the Adventure but reward renown, and the Defender of the Damned title if all are completed.
- Enter the Sea of the Damned
- Speak to the Pirate Lord, then sail your ship through the archway to begin your journey.
- Light a Lighthouse Beam
- Beams of light that shine from lighthouse beacons are the key to saving Merrick.
- Defeat Ghost Ships (3)
- Your ship's cannons are effective against Brethren vessels, but so are beams of light.
- Help Lower the Drawbridge
- Working together, find a way to lower the drawbridge atop the tavern and reach Merrick.
- Rescue Merrick
- Reach the top of the Twisted Sea Dog Tavern and save Merrick from the Dark Brethren.
- Deliver a Letter to Serik
- Collect a message from Larinna and deliver it to The North Star Seapost.
Mementos
| Image | Memento | Description | Requirement |
|---|---|---|---|

|
'Hunter's Repose' Memento | "A portrait of 'Merry' Merrick, summoner of Megalodons, painted during more tranquil times.” | Complete the A Hunter's Cry Adventure to earn this Memento. |

|
Defender of the Damned | "A Title awarded to those who rescued Merrick from captivity in the Sea of the Damned." | Complete all Deeds in the A Hunter's Cry Adventure to earn this Title. |
Chapters
Chapter One: The Adventure Begins...
- As you approach any Outpost tavern, Larinna can be heard beckoning you over. Speak with her and select the "[BEGIN ADVENTURE] - I want to help save Merrick!" dialogue option.
- Once Larinna has delivered the dialogue, you will receive a note directing you to speak with the Pirate Lord on the dock.
- Speak to the Pirate Lord on the dock and select the "[CONTINUE ADVENTURE] - I'm not here to chat, I'm here to help!" dialogue option.
- After a short section of spoken dialogue, a nearby Tunnel of the Damned will open with a large, swirling, blue cloud in view. Sail your ship through the portal.
- Your ship will travel for a short while until it reaches the end gateway, where it will be transported into the Sea of the Damned.
- After progressing through the portal, you'll heading towards The Damned Sea Dogs Tavern alongside three other crews, upon approach Dark Brethren Ghost Ship will begin to assault you.
- Making your way past the Ghost Ships, there are three lighthouses surrounding the Twisted Sea Dogs Tavern. These lighthouses must be approached, and ignited in order to advance with the Adventure.
- Outside each lighthouse is a never-ending swarm of Brethren Phantoms and a brazier containing the Flame of Souls. Ignite your lantern with the flame from this brazier.
- Outside each lighthouse are two extinguished braziers, ignite both with the Flame of Souls and the mist wall preventing your entry into the lighthouse will be removed.
- Note: Upon entering each lighthouse, there are two gold piles worth roughly 500 - 1,000
 each. Make sure to pick them up if you arrive first.
- Note: Upon entering each lighthouse, there are two gold piles worth roughly 500 - 1,000
- Make your way to the top of the lighthouse and light the brazier, this will announce to everyone that your lighthouse has been ignited.
- Maneuver the light from your lighthouse to ignite any inactive braziers you see on the central island. Each lighthouse should have one brazier to ignite using the light.
- Once all three lighthouses are lit and used to ignite their respective braziers, approach the main island via the primary docks.
- Make your way up towards the tavern, there will be three small braziers you need to ignite with your lantern along the way.
- If all the steps were correctly followed, you should be able to access a nearby capstan to open a door. If the capstan is blocked off by ghostly energy then a brazier or lighthouse was missed.
- After raising the door, you'll gain access to another small brazier, which will reveal a larger brazier upon being ignited. Someone must use the nearby lighthouse to ignite the brazier in order to open up the path.
- After opening the path, you will meet a similar situation two more times where a small brazier will reveal a larger one which then must be ignited with the nearest lighthouse.
- After the third and final pathway is cleared, you will reach another capstan which you must use to lower the drawbridge across to the top of the Tavern. If the capstan is unassailable then a brazier was missed somewhere.
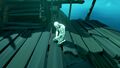
- Cross the drawbridge after it's lowered and make your way up the stairs. As you head up, you can spot Merrick, talking to him will advance the adventure and begin the confrontation.
- Note: There's a small stairwell down directly near Merrick which leads to a room filled with gold piles, worth an approximate 500 - 1,500 each. These gold piles will only appear you've approached close enough to the Brethren standing on the main stage.
- Note: There's a small stairwell down directly near Merrick which leads to a room filled with gold piles, worth an approximate 500 - 1,500
- Upon the adventure ending, you will be returned to your boat and sent through the Tunnels of the Damned. The chapter will complete upon your return to the Sea of Thieves and award you with 5,000 .
- Note: It's possible for an error to arise that drops you back at the Damned Sea Dogs tavern. If this happens, you must repeat Chapter One in order to access Chapter Two, unless someone else in your crew has already completed Chapter One successfully.
Chapter Two: A Last Request
- Find Larinna at any Outpost tavern, then speak with her and select the "[CONTINUE ADVENTURE] - The Pirate Lord mentioned a favour?" dialogue option.
- Once Larinna has delivered the dialogue, you will receive a note directing you to speak with Merrick's wife, Serik. at North Star Seapost.
- Speak with Serik and select the "[COMPLETE ADVENTURE] - I have a message for you..." dialogue option.
- After a short section of spoken dialog the scene will end and the Adventure will complete.
Dialogue
Chapter One dialogue
Beginning Chapter One
Larinna
You have a moment, Captain? I'm recruiting pirates to help us rescue Merrick!
I want to ask you something...
Hmm? What's on your mind?
- ↳ Why did you call me a Captain?
-
-
-
-
You haven't heard? It's the Pirate Lord's idea, helping pirates become Captains of Adventure with a ship of their own to command He'll even help you give it a name!
Obviously, buying a ship costs gold, and you'll need more to decorate your quarters, keep the barrels stocked and make sure everything stays in fine condition.
Once you own a ship, the Shipwrights can make a record of the customisations and decorations you've chosen, so you can set sail all the quicker next time.
On top of that, there are perks like supply delivery and special Voyages that are reserved for Captains and any crewmates sailing with them.
Honestly, if I didn't have work to do at the Outpost, even I might be counting my coins right now...- ↳ See any interesting newcomers lately?
-
-
-
-
Now that you mention it, I did hear an awful lot of sawing and hammering the other day. When I went to poke around, I met a very... strange... stranger.
They were dressed up like they were heading out to a noble's court and barely gave me the time of day when they found out I wasn't a Captain. Hmph.
Since then I've seen them running this way and that, delivering chests to the Gold Hoarders, skulls to the Order of Souls - you name it, they seem to be transporting it!
Their marquee is a little out of the way, but if you're sailing on a Captained ship, maybe you can talk to them and see what all the fuss is about...- ↳ What is there to do around here?
-
-
-
-
Well, this is an Outpost, so it's mostly about grabbing supplies, buying equipment and getting ready to set sail.
If you're looking for work, you can speak to the Trading Company representatives for Voyages.
Or you could try your luck with a map from the Quest Board on the docks. Who knows what you might dig up?
Whatever you choose, you can check the signposts to help find your way around the island.
Just remember, Outposts are busy places. Linger too long and other pirates might take an interest in your affairs...
[BEGIN ADVENTURE] - I want to help save Merrick!
Starts Voiceover
During Chapter One
Larinna
Head to the docks when you're ready to rescue Merrick. The Pirate Lord is waiting for you...
Pirate Lord
Sorry, my friend, but I've little time for conversation. Great deeds are afoot...
[CONTINUE ADVENTURE] - I'm not here to chat, I'm here to help!
Starts Voiceover
-
-
-
-
After the Portal has Opened
Pirate Lord
The passage to the Sea of the Damned has been opened! Gather supplies, sail through the archway and then I'll fill you in on my plan...
Arriving at The Damned Sea Dogs Tavern
Merrick
Cor, I never thought I'd see another friendly face! You are here to 'elp me, ain'tcha?
That's right, you're being Officially Rescued!
Begin the confrontation voiceover
-
-
-
-
After speaking to Merrick
Chapter Two dialogue
Beginning Chapter Two
Larinna
You have a moment, Captain? I'm recruiting pirates to help us rescue Merrick!
I want to ask you something...
Hmm? What's on your mind?
- ↳ Why did you call me a Captain?
-
-
-
-
You haven't heard? It's the Pirate Lord's idea, helping pirates become Captains of Adventure with a ship of their own to command He'll even help you give it a name!
Obviously, buying a ship costs gold, and you'll need more to decorate your quarters, keep the barrels stocked and make sure everything stays in fine condition.
Once you own a ship, the Shipwrights can make a record of the customisations and decorations you've chosen, so you can set sail all the quicker next time.
On top of that, there are perks like supply delivery and special Voyages that are reserved for Captains and any crewmates sailing with them.
Honestly, if I didn't have work to do at the Outpost, even I might be counting my coins right now...- ↳ See any interesting newcomers lately?
-
-
-
-
Now that you mention it, I did hear an awful lot of sawing and hammering the other day. When I went to poke around, I met a very... strange... stranger.
They were dressed up like they were heading out to a noble's court and barely gave me the time of day when they found out I wasn't a Captain. Hmph.
Since then I've seen them running this way and that, delivering chests to the Gold Hoarders, skulls to the Order of Souls - you name it, they seem to be transporting it!
Their marquee is a little out of the way, but if you're sailing on a Captained ship, maybe you can talk to them and see what all the fuss is about...- ↳ What is there to do around here?
-
-
-
-
Well, this is an Outpost, so it's mostly about grabbing supplies, buying equipment and getting ready to set sail.
If you're looking for work, you can speak to the Trading Company representatives for Voyages.
Or you could try your luck with a map from the Quest Board on the docks. Who knows what you might dig up?
Whatever you choose, you can check the signposts to help find your way around the island.
Just remember, Outposts are busy places. Linger too long and other pirates might take an interest in your affairs...
[BEGIN ADVENTURE] - I want to help save Merrick!
Replay Chapter 1
[CONTINUE ADVENTURE] - The Pirate Lord mentioned a favour?
Starts Voiceover for Chapter 2
During Chapter Two
Larinna
Deliver that letter I gave you to North Star Seapost. I'm sure Serik will appreciate it...
Finishing Chapter Two
Serik
I'm Serik, head of The Hunter's Call! It's a family venture - across these seas you'll also find Derrick, Annick, Aifrick, Zharick, Emerick and Hendrick!
[COMPLETE ADVENTURE] I have a message for you...
Begin Voiceover
-
-
-
-
Progress Log
VIEW PROGRESS LOG
|
|---|
| Beginning the Adventure The identity of Merrick’s killer has been laid bare, but he remains a captive of the Dark Brethren. Determined to save the helpless Hunter, the Pirate Lord has an audacious plan to infiltrate the Sea of the Damned itself…
Thanks to the valiant efforts of those loyal to the Pirate Lord, Merrick has been recovered from the Sea of the Damned, but a happy homecoming is not to be.
With Merrick’s parting words to Serik delivered as promised, pirates across the Sea of Thieves now face an uncertain future – and the echoes of a Hunter’s cry… |
Trivia
- During Chapter Two, the adventure's journal located on the Captain's Table had no description or image set, causing the journal on the to be blank other than the adventure's name. Occasionally it would display the last displayed image with the text "X No Icon"' in the top right corner instead, most commonly this would be the image used when voting at an emissary table.
- When chapter one comes to a close the Pirate Lord's dialogue alluded to Merrick's relocation to the Athena's Fortune Hideout, with the release of patch 2.6.1 and the adventure's closure.
- This is the second Adventure to require the cooperation of other crews, the first one being The Shrouded Deep.
Gallery

Promotional image of Amaranta at the The Damned Sea Dogs Tavern.

Promotional image of Wanda and Duke at the The Damned Sea Dogs Tavern.
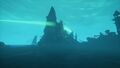
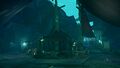
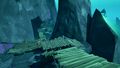
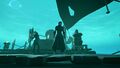
Promotional image of the The Damned Sea Dogs Tavern.

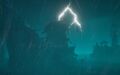
A unique Ghost Ship that's seen circling the island.


The Damned Sea Dogs Tavern
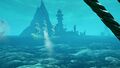
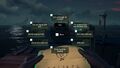
The view as seen while approaching The Damned Sea Dogs Tavern.
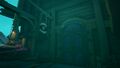
The Main entrance to the tavern.
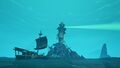
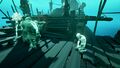
An Overview of the main island.
Another angle of the main island.
The Docks which belonged to The Good Boy.
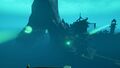
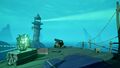
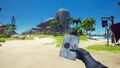
One of the three lighthouses which surround the island.
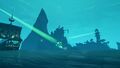
The beams of the lighthouses concentrated on the main island.

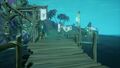
The main docks of the damned sea dogs tavern become visible only after igniting a lantern.
The empty and broken down shop stalls.
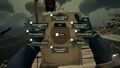
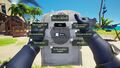
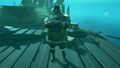
A cannon positioned on the middle levels of the island to help pirates return to a lighthouse and adjust the lights.

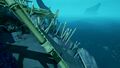
A portion of the challenge route before the brazier is lit.
An example of a shortcut created by igniting a brazier.
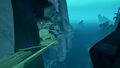
The spectral platforms created by igniting a lantern along the challenge route.
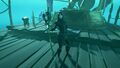
The final connection to the roof is a drawbridge which must be lowered.

The tunnel of the damned portal begins to glow red when time is short.


Quest Notes
Larinna's note telling you to meet the pirate lord.
Larinna's note Pirate Chat Radial.
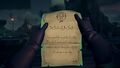
The Pirate Lord's note telling you to sail through the arch into the Sea of the Damned.
The Pirate Lord's note pirate chat radial.
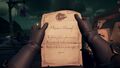
Merrick's note asking you to deliver a letter to Serik.
Merrick's note pirate chat radial.
Merrick's letter for Serik

Merrick's letter pirate chat radial.

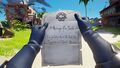
Merrick's letter as seen when read by Serik.


Characters
The Pirate Lord as seen explaining the plan in the Tunnels of the Damned.
Amaranta as seen on top of the tavern.
Duke as seen on top of the tavern.
All three Dark Brethren members as seen on top of the tavern.
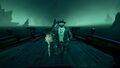
Merrick as seen on top of the tavern.

The pirate lord confronting the Dark Brethren.
The pirate lord talking to Merrick after the Brethren escape.


Videos
Patch history
- 2.6.1 (September 1, 2022)
- Adventure concludes.
- 2.6.0.1 (August 18, 2022)
Externals links
- Adventures Ahead: ‘A Hunter’s Cry’, Sea of Thieves News
- Adventures Ahead: ‘The Sirens’ Prize’ (A Hunter's Cry Recap), Sea of Thieves News